Change
Change label
This step replaces one label with another.
| Option | Description |
|---|---|
| Label | Choose a label to be changed. |
| Replace with | Choose which label to change the selected label into, or choose Clear to clear the label |
Change by Shape
Change by Shape makes it possible to change one label to another by evaluating one of the shape properties of the label.
All shape properties, except Area, Major- and Minor Axis Length and Eccentricity, use the simplified objects, which are continuous representations of objects instead of the pixelated objects. When using the pixelated objects, the measures can be wrongly estimated. E.g. calculating the perimeter of an object as the outline of the pixelated object makes the perimeter artificially longer than the real perimeter as object borders not parallel to x- and y-axis contribute with up the times more than they should.
Area
The Change by Area step will change a given label according to the Area measure of a label. The area is calculated from pixelated object. The processing step has four input parameters:
| Option | Description |
|---|---|
| Label | Defines the label which the step should alter. |
| Replace with | Choose which label to replace the current label with. It is possible to choose Clear, to have no label in the areas. |
| Minimum | Change objects with area larger than or equal to this value. |
| Maximum | Change objects with area smaller than or equal to this value. |


Change by Area used to change remove the smallest labels. Left to right: Original Image. Image with initial labels. Image with smallest labels removed (Lung Tissue Ki67).
Perimeter
The Change by Perimeter step will change a given label according to the Perimeter measure of the simplified object. The processing step has four input parameters:
| Option | Description |
|---|---|
| Label | Defines the label which the step should alter. |
| Replace with | Choose which label to replace the current label with. It is possible to choose Clear, to have no label in the areas. |
| Minimum | Change objects with perimeter larger than or equal to this value. |
| Maximum | Change objects with perimeter smaller than or equal to this value. |
Major Axis Length
The Change by Major Axis Length step will change a given label according to the Major Axis length of an ellipse fitted to the object. The fitted ellipse has the same second order central moments as the object. The processing step has four input parameters:
| Option | Description |
|---|---|
| Label | Defines the label which the step should alter. |
| Replace with | Choose which label to replace the current label with. It is possible to choose Clear, to have no label in the areas. |
| Minimum | Change objects with major axis larger than or equal to this value. |
| Maximum | Change objects with a major axis smaller than or equal to this value. |
Minor Axis Length
The Change by Minor Axis Length step will change a given label according to the Minor Axis length of an ellipse fitted to the object. The fitted ellipse has the same second order central moments as the object. The processing step has four input parameters:
| Option | Description |
|---|---|
| Label | Defines the label which the step should alter. |
| Replace with | Choose which label to replace the current label with. It is possible to choose Clear, to have no label in the areas. |
| Minimum | Change objects with minor axis larger than or equal to this value. |
| Maximum | Change objects with a minor axis smaller than or equal to this value. |
Eccentricity
The Change by Eccentricity step will change a given label according to the Eccentricity measure of an ellipse fitted to the object. The fitted ellipse has the same second order central moments as the object. The eccentricity is a circularity measure defined as
where is the length of the major axis and is the length of the minor axis. The eccentricity will equal 1 for a line and 0 for a circle approximately. The processing step has four input parameters:
| Option | Description |
|---|---|
| Label | Defines the label which the step should alter. |
| Replace with | Choose which label to replace the current label with. It is possible to choose Clear, to have no label in the areas. |
| Minimum | Change objects with eccentricity larger than or equal to this value. |
| Maximum | Change objects with eccentricity smaller than or equal to this value. |
Form Factor
The Change by Form Factor step will change a given label according to the Form Factor measure. Form Factor is a measure of the degree of circularity of the object. This measure uses properties of the simplified object. The Form Factor is defined as
Where Area s is the area of the simplified object and Perimeter s is the perimeter of the simplified object.
- Value range 0 to 1
- A value near 1 indicates a perfect circle.
- Lower values indicate elongated or irregular shapes.
The processing step has four input parameters:
| Option | Description |
|---|---|
| Label | Defines the label which the step should alter. |
| Replace with | Choose which label to replace the current label with. It is possible to choose Clear, to have no label in the areas. |
| Minimum | Change objects with Form Factor larger than or equal to this value. |
| Maximum | Change objects with Form Factor smaller than or equal to this value. |
Visiopharm only works with raster images, meaning that no label can be perfectly round/smooth. As a result of this and the Coastline Paradox, most form factors are typically 10%-1% smaller than their theoretical counter parts (a higher resolution/magnification lowers the deviation closer to the theoretical).


The figures show the different values of theoretical form factors, the ranges of the actual form factors in the Visopharm software and the predicted shapes of the belonging objects.
Convexity
The Change by Convexity step modifies a given label based on the Convexity measure. Convexity quantifies how convex an object is by comparing the perimeter of its convex hull to the actual perimeter of the object, using the measured properties of the simplified object. Convexity is defined as:
Where Perimeter c,s is the perimeter of the simplified object of the convex hull of an object and Perimeter s is the perimeter of the simplified object.
- Value range 0 to 1
- A value of 1 means the object has no indentations.
- Lower values indicates concave or complex boundaries.
The processing step has four input parameters:
| Option | Description |
|---|---|
| Label | Defines the label which the step should alter. |
| Replace with | Choose which label to replace the current label with. It is possible to choose Clear, to have no label in the areas. |
| Minimum | Change objects with Convexity larger than or equal to this value. |
| Maximum | Change objects with Convexity smaller than or equal to this value. |
Solidity
The Change by Solidity step will change a given label according to the Solidity measure. Solidity reflects how solid or filled an object is by comparing its area to the area of the convex hull, the measure uses properties of the simplified object. The Solidity is defined as
Where Areac,s is the area of the simplified object of the convex hull of an object and Areas is the area of the simplified object.
- Value range 0 to 1
- A value of 1 means the object is completely filled / No internal gaps.
- Lower values represent fragmented or porous structures.
The processing step has four input parameters:
| Option | Description |
|---|---|
| Label | Defines the label which the step should alter. |
| Replace with | Choose which label to replace the current label with. It is possible to choose Clear, to have no label in the areas. |
| Minimum | Change objects with Solidity larger than or equal to this value. |
| Maximum | Change objects with Solidity smaller than or equal to this value. |
Ellipticalness
The Change by Ellipticalness step will change a given label according to the Ellipticalness measure. This measure uses properties of the simplified object. The Ellipticalness is defined as
where is the area of the ellipse fitted to the object, Areas is the area of the simplified object, MajorAxis and MinorAxis are the axes of the ellipse fitted to the object. Ellipticalness is a value between 0 and 1 which represent how identical the object is to an ellipse. Ellipticalness 1 corresponds to an ellipse.
The processing step has four input parameters:
| Option | Description |
|---|---|
| Label | Defines the label which the step should alter. |
| Replace with | Choose which label to replace the current label with. It is possible to choose Clear, to have no label in the areas. |
| Minimum | Change objects with Ellipticalness larger than or equal to this value. |
| Maximum | Change objects with Ellipticalness smaller than or equal to this value. |
Circularity (Deprecated)
Change by circularity is deprecated, consider using change by form factor instead. The change by circularity step will change a given label according to the circularity measure, defined as
Where the O is the circumference and A is the area of the label. This value can be between 1 for a perfect circle, and more than 100 for highly irregular objects.
The processing step has four input parameters:
| Option | Description |
|---|---|
| Label | defines the label which the step should alter. |
| Replace with | Choose which label to replace the current label with. It is possible to choose clear, to have no label in the areas. |
| Minimum | Change objects with circularity larger than or equal to this value. |
| Maximum | Change objects with circularity smaller than or equal to this value. |
Change Largest
This step will replace the largest area of one label with another.
| Option | Description |
|---|---|
| Label | Choose a label for which the largest object should be changed. |
| Replace with | Choose which label to replace the label area with. It is possible to choose Clear, to have no label in the area. |
Change Surrounded
This step will replace areas of one label which is partly or wholly, surrounded by a chosen label with a third label chosen by the user.
| Option | Description |
|---|---|
| Label | Choose a label that is surrounded by another label. The areas of the label that are surrounded by the "Surrounded by" label will be changed. |
| Surrounded by | Choose the label that is surrounding the label to be changed, or choose Clear if the surrounding label should be the clear label. |
| Coverage | Select how big a fraction of the inner label's circumference should be touching the outer label. This number should be between 0 and 1. |
| Replace with | Choose which label to replace the inner label with if the Coverage criteria is fulfilled. |
| Include image border | Toggles whether or not the image border counts as part of the surrounding label. |


Image before and after post processing step, where red labels within blue labels are changed to pink labels (Ki-67+PanCK, Breast Cancer).
Change to Surrounding
This step will replace a label with its surrounding label.
| Option | Description |
|---|---|
| Label | Choose label which should be changed to its surrounding. |
The method handles each label object individually, so some label objects of the chosen type may be changed to one label type, and others to another label type.
Change by Intensity
The Change by intensity step will change a given label according to the average of the underlying intensity covered by the label segment. The processing step has five input parameters:
| Option | Description |
|---|---|
| Label | Defines the label which the step should alter. |
| Replace with | Choose which label to replace the current label with. It is possible to choose Clear, to have no label in the areas. |
| Feature | Defines the color band or designed feature on which the post processing step is performed. |
| Threshold | Defines the threshold range at which the label is changed/not changed. The values between the threshold values are the ones which are replaced. To include all values towards either infinity or minus infinity, simply leave one of the upper or lower fields empty respectively (not zero, but completely blank). |
| Percent of Object | Defines the label pixel range, which is used to calculate the mean. This mean is then used for thresholding. Setting the lower Percent of Object value to 10% means that the 10% darkest pixel values in the label are not used to calculate the mean. Likewise, a upper value of 80% etc, means that the brightest 20% pixel values are not used to calculate the mean. |


Change by intensity used to highlight cells of interest. Left to right: Original Image. Image with initial labels. Image with labels with changed coloration (Lung Tissue Ki67).
Change Close Objects
Change Close Objects converts the label ("Label") that lies within a given radius ("Distance") of a given label ("Close to") and replaces this label with another chosen label ("Replace with").
| Option | Description |
|---|---|
| Label | Choose label to convert. |
| Close to | Choose the label from which the radius should be drawn. The label does not have to be circular. (Note the radius will not be shown). |
| Distance | Set the distance of the radius in the current unit. |
| Only nearest object | Select only the nearest object. |
| Replace with | Choose the label to give the labels within the radius. |


Change Close Objects used to change the blue label to red label. Left to right: Original Image. Image with the radius visualized. Image after conversion of the labels within the radius.
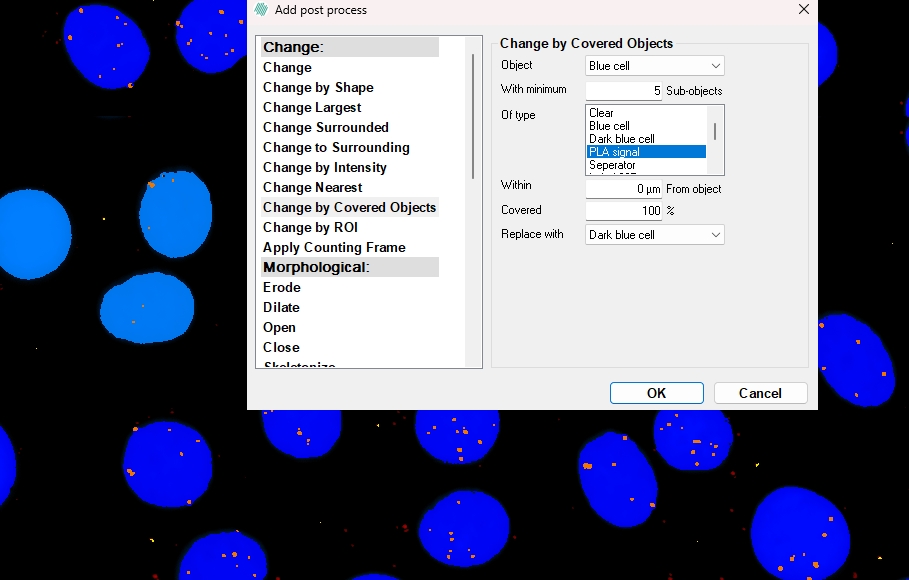
Change by Covered Objects
The Change by Covered Objects step will change a given label according to the count and type of other label objects inside it or within a certain distance from the object, i.e. neighboring objects. The processing step has five input parameters:
| Option | Description |
|---|---|
| Label | Defines the label objects which the step should alter. |
| Minimum subobjects | Minimum required count of subjects inside the object to change. |
| Type | Defines the label of the other objects that is inside the object to change. |
| Distance from object | The distance from the object that the neighboring objects should be located within. The distance is defined as edge to edge. Basically, the size of the object defined under Label increases. |
| Percent surrounded by object | Count only subjects covered at least this much by the object to change. |
| Replace with | Choose which label to replace the current label with. It is possible to choose Clear, to have no label in the areas. |
Change within
The Change within step is used to change an object's label from one label to another, based on whether the majority of the object's area resides inside a selected ROI or annotation. For example, if a tumor ROI is located inside a stroma ROI, the change within step could be used to change the label of all nuclei that primarily reside within the tumor ROI.
| Option | Description |
|---|---|
| Change Label | Defines the label which the step should alter. |
| To Label | Choose which label to replace the current label with. It is possible to choose Clear, to not label the objects. |
| For every pixel within ROI | Defines within what ROI object labels should change. It is possible to choose Clear, which is the area where no defined ROI resides. |
| For every pixel within Annotation | Defines within what annotation object labels should change. It is possible to choose Clear, which is the area where no defined annotations resides. |
Apply counting frame
A counting frame can either be used to count already existing objects or applied to an app which also locates the objects. How to apply these methods are explained in the following sections. For both methods it is important that the counting frame is applied under the Advanced Sampling.
This step removes any annotation or label inside the field of view that touches the red line or that lie completely outside the counting frame used in the sampling of the image. Note that this step requires that a counting frame has been added through the Advanced dialog of the setup page of the APP Author dialog.
| Option | Description |
|---|---|
| Object type | Choose the object type to be processed by the step (either Label or Annotation). |
| Object | Choose which label or annotation to be processed by the step. |
If 'Object' is set to 'All', then all objects are internally converted to the same type. If two different objects (i.e. a label 1 object and a label 2 object) touch each other and one object is completely outside while the second object is partly inside the counting frame (crossing the green line), then the object outside the frame will not be removed.
Counting frame needs to be added after any Morphological post processing steps, but can be added before any Change post processing steps.
Counting frame NEEDS to be added before Change by intensity.
Revert Label changes
The Revert Label changes step is used to undo all changes made to any labels by the APP, i.e. reverts any label changes made by running the APP, including the classification. This step can be useful in cases where one wants to apply a set of post-processing steps to identify objects of interest, but then wants to return to the original labels. There is no configurable parameters for this post processing step.