Threshold
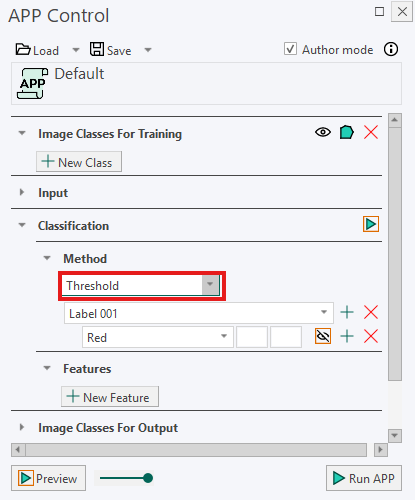
Threshold classification assigns pixels to labels based on predefined value ranges. For each label, specify the minimum and maximum values that a pixel may have for one or more image features.
For example, a label can be configured to include pixels with a staining intensity between two specified values. Adding thresholds for multiple features can make the classification more specific because pixels must satisfy the configured limits to be assigned to the label.
Threshold classification is useful when the relevant tissue types or structures can be separated using clear and consistent feature values. Unlike classifiers that learn from training labels, the Threshold classifier uses limits that are defined manually.
Threshold Example
-
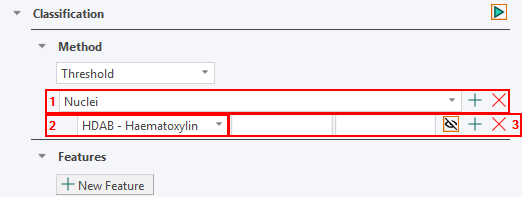
Label: Select a label for which to define threshold limits. To define thresholds for another label, click the
+button to the right of the label drop-down menu. To remove the threshold settings for a label, click theXbutton. In this example, the label Nuclei is selected. -
Feature: Select an image feature for the current label. A feature may represent information such as pixel intensity, color, or another calculated image property. To add another feature, click the
+button to the right of the feature drop-down menu. To remove a feature, click theXbutton. In this example, the feature HDAB - Haematoxylin is selected. -
Limits: Enter the lower and upper limits for the selected label and feature. The limits refer to pixel values in the corresponding feature image and can be entered using the keyboard. Pixels with feature values inside the specified range can be assigned to the selected label.
To preview the feature image, click the toggle button to the right of the limit input fields, and to the left of the + button. When preview is enabled, hover over the feature image to see the pixel values at the cursor position. This can help with identifying suitable value ranges for the limits.

Using a lower and an upper limit creates a defined range. If a range should have no lower or upper boundary, the interface may display this as -inf or inf, meaning negative or positive infinity.
The order of the labels is important when threshold ranges overlap. If a pixel satisfies the thresholds for more than one label, the label positioned highest in the class list takes priority over the labels below it.
It is possible to resolve unwanted overlaps in either of the following ways:
- Rearrange the class list so that the label with the highest priority appears first.
- Adjust the threshold limits so that the ranges do not overlap.
For example, if Label 002 uses a threshold of [73 → inf] for feature F(2), Label 001 can use [-inf → 72] for the same feature. This creates two separate ranges and prevents the labels from overlapping.
Running the Classification
- Define the required labels, features, and limits.
- In the Input section, use Regions To Analyze to select the ROIs that should be classified.
- Click Run APP to run the classification on the selected ROIs.
For best results, inspect the relevant feature images before setting the limits. This can help with identifying suitable value ranges and avoid unintended gaps or overlaps between labels.
Only features with a checkmark on the Feature List are used for classification.