K-means clustering
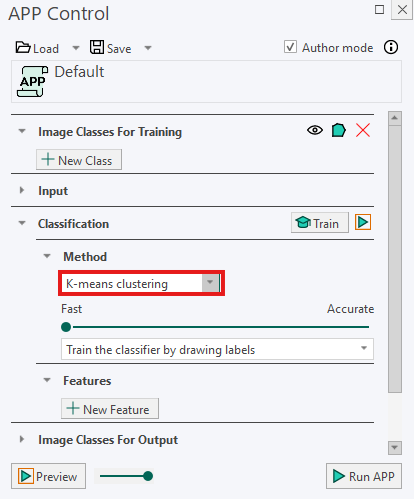
K-means clustering groups pixels according to similarities in their feature values, such as staining intensity, color, or other measured image properties. Pixels with similar values are placed in the same group, or cluster.
This method can be useful when staining or lighting varies throughout the data set because it identifies groups based on the feature values present in the analyzed images.
Before using K-means clustering, make sure the selected feature bands are comparable. The values in the different feature bands should be measured on approximately the same scale. Otherwise, a feature with a much larger range of values may have too much influence on the classification.
Slider
The slider controls the balance between classification speed and accuracy:
- Moving the slider toward Fast reduces the amount of processing and allows the classification to finish more quickly.
- Moving the slider toward Accurate performs a more detailed calculation. This may improve the separation between similar classes but increases the processing time.
It is often not necessary to use the highest accuracy setting. Start with a moderate setting and move the slider toward Accurate if similar tissue types or structures are not separated sufficiently.
Mode
K-means clustering can be used in either supervised or unsupervised mode.
Supervised mode
For supervised classification, set Mode to Train the classifier by drawing labels.
In this mode, training labels are used to show the classifier examples of the classes that should be identified. Draw representative training labels for every class that occurs in the image, such as:
- Background
- Cytoplasm
- Nuclei
Include examples that represent the variation within each class. For example, if nuclei appear with different staining intensities, label representative areas of both lighter and darker nuclei.
The classifier uses these examples to determine the most appropriate class for each pixel.
Unsupervised mode
In unsupervised mode, training labels are not required. Instead, specify the number of classes, or clusters, that the image should be divided into.
For example, if you select 5 classes, the classifier groups the analyzed pixels into five clusters based on similarities in their feature values.
The specified number should reflect how many visually or measurably distinct groups you expect to find in the image. However, the resulting clusters do not automatically correspond to biological structures. After running the classification, inspect the result to determine what each cluster represents. For example, one cluster may represent nuclei, while another may represent cytoplasm, background, or a variation in staining.
If too few classes are selected, different tissue types may be placed in the same cluster. If too many classes are selected, a single tissue type may be divided into several clusters.
Running the Classification
- Make sure the selected feature bands use approximately comparable scales.
- Select the required Mode.
- If using supervised mode, draw representative training labels for every class.
- If using unsupervised mode, specify the number of expected classes.
- In the Input section, use Regions To Analyze to select the ROIs that should be classified.
- Click Run APP to run the classification on the selected ROIs.
For best results, select ROIs that represent the variation in staining, lighting, and tissue appearance throughout the data set. Always inspect the classification result, especially when using unsupervised mode, to verify that the clusters correspond to meaningful structures.