Change
The Change post processing steps are used to convert labels from one type to another when specific criteria are met. Examples include changing all labels of a particular type, size or shape to another label type, or changing labels according to their surroundings. This section describes what each Change step does and how they can be configured.
Many Change steps use thresholds based on object properties such as area, length, or perimeter. To determine suitable threshold values:
- Hover over a label objects to view their areas.
- Use the Annotation tool to measure length, perimeter, and other dimensions.
When classifying smaller objects, such as nuclei or cells, it is often beneficial to apply a counting frame. This ensures that Change post processing steps are evaluated on entire objects.
Change label
The Change step replaces all occurrences of a selected label with another label. For example, replacing all instances of label 001 with label 002.
| Option | Description |
|---|---|
| Label | Choose a label to be changed. |
| Replace with | Choose which label to change the selected label into, or choose Clear to clear the label |
Change by Shape
The Change by Shape step makes it possible to change one label to another by evaluating a shape property of the label object. The shape property is selected in the Property drop down menu.
Most shape properties are calculated using simplified objects, which are continuous representations of objects rather than their original pixelated form. Measurements based on pixelated object boundaries can be inaccurate, particularly for diagonal and curved edges, where properties such as perimeter may be overestimated. Area, Major Axis Length, Minor Axis Length, and Eccentricity are calculated from the original pixelated objects.
Area
The Change by Area step changes a given label based on the area of the label object. The area is calculated from the pixelated object. The processing step has four input parameters:
| Option | Description |
|---|---|
| Label | Defines the label which the step should alter. |
| Replace with | Choose which label to replace the current label with. It is possible to choose Clear, to have no label in the areas. |
| Minimum | Change objects with area larger than or equal to this value. |
| Maximum | Change objects with area smaller than or equal to this value. |
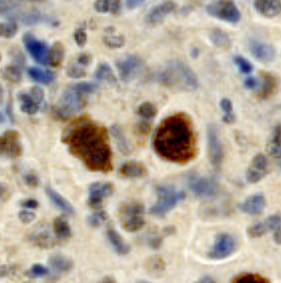
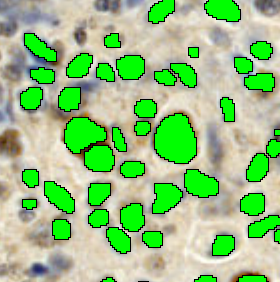
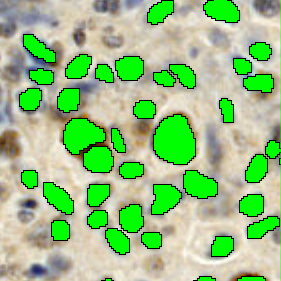
Change by Area used to remove the smallest labels. Left to right: Original Image. Image with initial labels. Image with smallest labels removed (Lung Tissue Ki67).
Perimeter
The Change by Perimeter step changes a given label based on the perimeter of the simplified object. The processing step has four input parameters:
| Option | Description |
|---|---|
| Label | Defines the label which the step should alter. |
| Replace with | Choose which label to replace the current label with. It is possible to choose Clear, to have no label in the areas. |
| Minimum | Change objects with perimeter larger than or equal to this value. |
| Maximum | Change objects with perimeter smaller than or equal to this value. |
Major Axis Length
The Change by Major Axis Length step will change a given label according to the Major Axis length of an ellipse fitted to the label object. The fitted ellipse has the same second order central moments as the label object. The processing step has four input parameters:
| Option | Description |
|---|---|
| Label | Defines the label which the step should alter. |
| Replace with | Choose which label to replace the current label with. It is possible to choose Clear, to have no label in the areas. |
| Minimum | Change objects with major axis larger than or equal to this value. |
| Maximum | Change objects with a major axis smaller than or equal to this value. |
Minor Axis Length
The Change by Minor Axis Length step will change a given label according to the Minor Axis length of an ellipse fitted to the label object. The fitted ellipse has the same second order central moments as the label object. The processing step has four input parameters:
| Option | Description |
|---|---|
| Label | Defines the label which the step should alter. |
| Replace with | Choose which label to replace the current label with. It is possible to choose Clear, to have no label in the areas. |
| Minimum | Change objects with minor axis larger than or equal to this value. |
| Maximum | Change objects with a minor axis smaller than or equal to this value. |
Eccentricity
The Change by Eccentricity step changes a given label according to the Eccentricity of an ellipse fitted to the label object. The fitted ellipse has the same second order central moments as the label object. The eccentricity is a measure of elongation and is defined as
where is the length of the major axis and is the length of the minor axis. The eccentricity will equal 1 for a line and 0 for a circle approximately. The processing step has four input parameters:
| Option | Description |
|---|---|
| Label | Defines the label which the step should alter. |
| Replace with | Choose which label to replace the current label with. It is possible to choose Clear, to have no label in the areas. |
| Minimum | Change objects with eccentricity larger than or equal to this value. |
| Maximum | Change objects with eccentricity smaller than or equal to this value. |
Form Factor
The Change by Form Factor step changes a given label according to the Form Factor. Form Factor is a measure of the degree of circularity of the object. This measure uses properties of the simplified object. The Form Factor is defined as
Where is the area of the simplified object and is the perimeter of the simplified object.
- Value range 0 to 1
- A value near 1 indicates a perfect circle.
- Lower values indicate elongated or irregular shapes.
The processing step has four input parameters:
| Option | Description |
|---|---|
| Label | Defines the label which the step should alter. |
| Replace with | Choose which label to replace the current label with. It is possible to choose Clear, to have no label in the areas. |
| Minimum | Change objects with Form Factor larger than or equal to this value. |
| Maximum | Change objects with Form Factor smaller than or equal to this value. |
Visiopharm only works with raster images, meaning that no label can be perfectly round/smooth. As a result of this and the Coastline Paradox, most form factors are typically 10%-1% smaller than their theoretical counter parts (a higher resolution/magnification lowers the deviation closer to the theoretical).
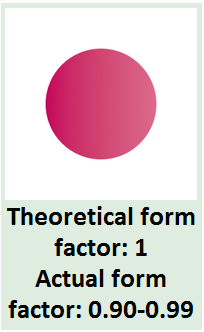
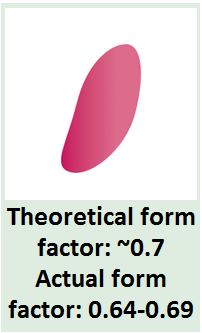
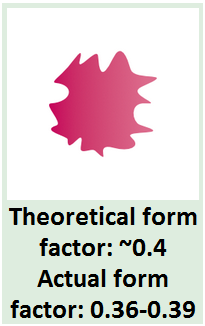
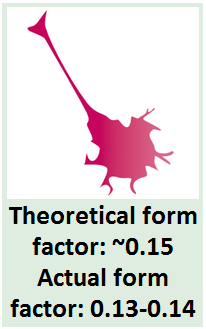
The figures show the different values of theoretical form factors, the ranges of the actual form factors in the Visopharm software and the predicted shapes of the belonging objects.
Convexity
The Change by Convexity step changes a given label based on the Convexity. Convexity quantifies how convex an object is by comparing the perimeter of its convex hull to the actual perimeter of the object, using the measured properties of the simplified object. Convexity is defined as:
Where is the perimeter of the simplified object of the convex hull of an object and is the perimeter of the simplified object.
- Value range 0 to 1
- A value of 1 means the object has no indentations.
- Lower values indicate concave or complex boundaries.
The processing step has four input parameters:
| Option | Description |
|---|---|
| Label | Defines the label which the step should alter. |
| Replace with | Choose which label to replace the current label with. It is possible to choose Clear, to have no label in the areas. |
| Minimum | Change objects with Convexity larger than or equal to this value. |
| Maximum | Change objects with Convexity smaller than or equal to this value. |
Solidity
The Change by Solidity step changes a given label according to the Solidity. Solidity reflects how solid or filled an object is by comparing its area to the area of the convex hull, the measure uses properties of the simplified object. The Solidity is defined as
Where is the area of the simplified object of the convex hull of an object and is the area of the simplified object.
- Value range 0 to 1
- A value of 1 means the object is completely filled / no internal gaps.
- Lower values represent fragmented or porous structures.
The processing step has four input parameters:
| Option | Description |
|---|---|
| Label | Defines the label which the step should alter. |
| Replace with | Choose which label to replace the current label with. It is possible to choose Clear, to have no label in the areas. |
| Minimum | Change objects with Solidity larger than or equal to this value. |
| Maximum | Change objects with Solidity smaller than or equal to this value. |
Ellipticalness
The Change by Ellipticalness step changes a given label according to the Ellipticalness. This measure uses properties of the simplified object. The Ellipticalness is defined as
where is the area of the ellipse fitted to the object, is the area of the simplified object, and are the axes of the ellipse fitted to the label object. Ellipticalness is a value between 0 and 1 which represent how identical the object is to an ellipse. Ellipticalness 1 corresponds to an ellipse.
The processing step has four input parameters:
| Option | Description |
|---|---|
| Label | Defines the label which the step should alter. |
| Replace with | Choose which label to replace the current label with. It is possible to choose Clear, to have no label in the areas. |
| Minimum | Change objects with Ellipticalness larger than or equal to this value. |
| Maximum | Change objects with Ellipticalness smaller than or equal to this value. |
Circularity (Deprecated)
The Change by circularity step is deprecated, consider using change by Form Factor instead. The change by Circularity step changes a given label according to the circularity, defined as
Where the is the circumference and is the area of the label. This value can be between 1 for a perfect circle, and more than 100 for highly irregular objects.
The processing step has four input parameters:
| Option | Description |
|---|---|
| Label | Defines the label which the step should alter. |
| Replace with | Choose which label to replace the current label with. It is possible to choose clear, to have no label in the areas. |
| Minimum | Change objects with circularity larger than or equal to this value. |
| Maximum | Change objects with circularity smaller than or equal to this value. |
Change Largest
The Change Largest step replaces the label object with the largest area among objects of a selected label with another label.
| Option | Description |
|---|---|
| Label | Choose a label for which the largest object should be changed. |
| Replace with | Choose which label to replace the label of the object with. It is possible to choose Clear, to have no label in the area. |
Change Surrounded
The Change Surrounded step replaces label objects of a selected label that are partly or completely surrounded by another selected label. Whether a label object is changed depends on the specified coverage fraction.
| Option | Description |
|---|---|
| Label | Choose the label to evaluate. Label objects of this label will change if the coverage criterion is met. |
| Surrounded by | Choose the label that must surround the selected label. Choose Clear if the surrounding label should be the clear label. |
| Coverage | Specify the minimum fraction of the selected label object's circumference that must be in contact with the surrounding label. The value must be between 0 and 1. |
| Replace with | Choose the label that will replace the selected label when the coverage criterion is met. |
| Include image border | Toggles whether the image border counts as part of the surrounding label. |
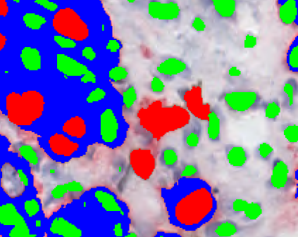
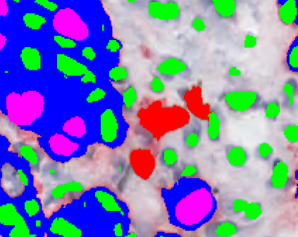
Image before and after the Change Surrounded post processing step, where red labels within blue labels are changed to pink labels (Ki-67+PanCK, Breast Cancer).
Change to Surrounding
The Change to Surrounding step replaces a label with its surrounding label. The surrounding label may also be the Background or Clear label. If a label is surrounded by multiple labels, it is replaced by the label that surrounds the largest part of it.
| Option | Description |
|---|---|
| Label | Choose label which should be changed to its surrounding. |
The method handles each label object individually, so some label objects of the chosen type may be changed to one label type, and others to another label type.
Change by Intensity
The Change by Intensity step changes a label based on the average intensity of a selected feature. A label object is changed if the average intensity of the selected feature within the label object falls within the specified threshold range. The processing step has five input parameters:
| Option | Description |
|---|---|
| Label | Defines the label which the step should alter. |
| Replace with | Choose which label to replace the current label with. It is possible to choose Clear, to have no label in the areas. |
| Feature | Defines the color band or designed feature on which the post processing step is performed. |
| Threshold | Defines the threshold range at which the label is changed/not changed. The values between the threshold values are the ones which are replaced. To include all values towards either infinity or minus infinity, simply leave one of the upper or lower fields empty respectively (not zero, but completely blank). |
| Object % | Defines the label pixel range, which is used to calculate the mean. This mean is then used for thresholding. Setting the lower Percent of Object value to 10% means that the 10% darkest pixel values in the label are not used to calculate the mean. Likewise, an upper value of 80% etc., means that the brightest 20% pixel values are not used to calculate the mean. |
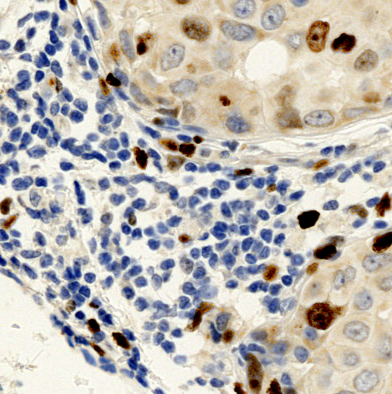
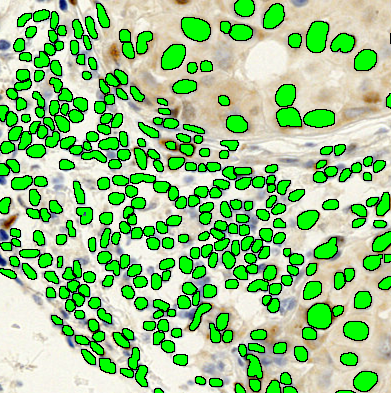
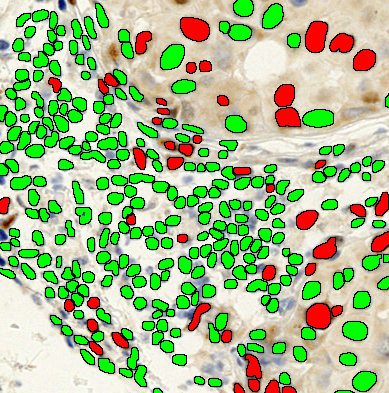
Change by intensity used to highlight cells of interest. Left to right: Original Image. Image with initial labels. Image with labels with changed coloration (Lung Tissue Ki67).
Change Close Objects
The Change Close Objects step changes label objects of one label when they are within a specified distance of another label.
| Option | Description |
|---|---|
| Label | Choose the label to change. |
| Close to | Choose the label that the distance is measured to. |
| Distance | Set the maximum distance between the labels. Note that the distance radius is not displayed in the image. |
| Only nearest object | Only change the nearest matching label object. |
| Replace with | Choose the replacement label. |
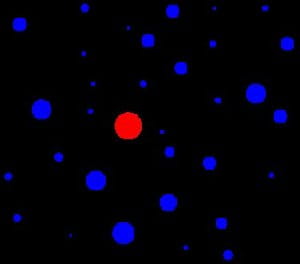
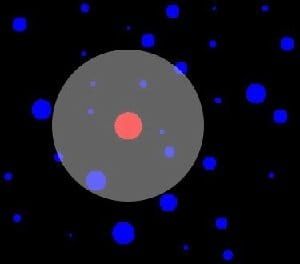
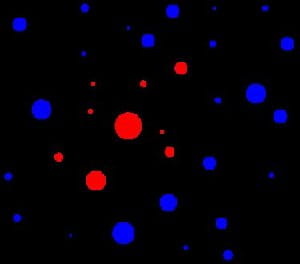
The Change Close Objects step used to change the blue label to red label. Left to right: Original Image. Image with the distance radius visualized. Image after conversion of the labels within the radius.
Change by Covered Objects
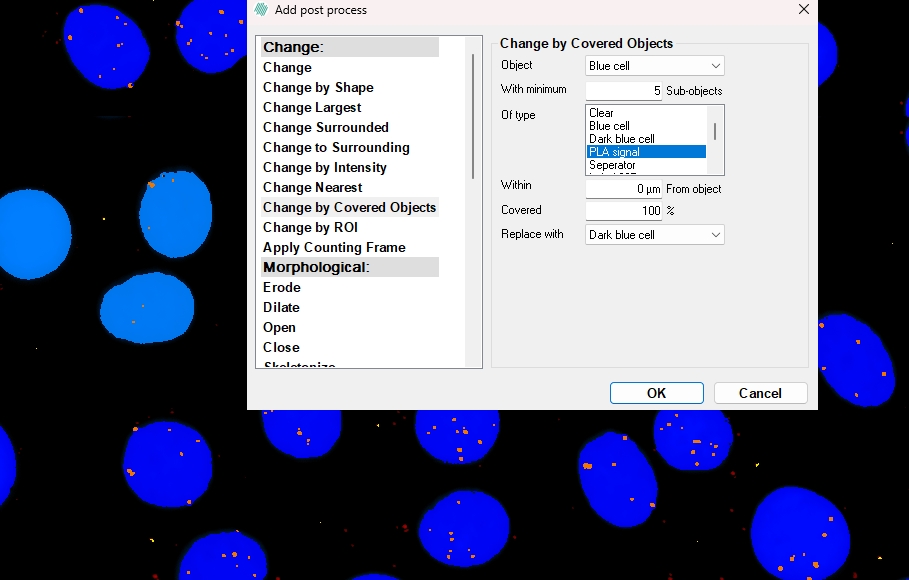
The Change by Covered Objects step will change a given label object according to the count and type of other label objects inside it or within a distance from it. The processing step has five input parameters:
| Option | Description |
|---|---|
| Object | Choose the label to change. |
| With minimum --- Sub-objects | Specify the minimum number of sub-objects inside or near the chosen label object, required for the label to be changed. |
| Of type | Choose the sub-object label type to count. |
| Within --- From object | Count objects located within this distance of the label object. The distance is measured edge-to-edge. |
| Covered | Only count sub-objects whose area is covered by the label object by at least this percentage. A value of 0% also includes objects located within the specified distance from the label object. |
| Replace with | Choose the replacement label. |
Setting Covered to 0% allows objects within the specified Within --- From object distance to be counted, even if they do not touch or overlap the label object.
Change Within
The Change Within step is used to change an object's label from one label to another, based on whether the majority of the object's area resides inside a selected ROI or annotation. For example, if a tumor ROI is located inside a stroma ROI, the change within step could be used to change the label of all nuclei that primarily reside within the tumor ROI.
| Option | Description |
|---|---|
| Change Label | Defines the label which the step should alter. |
| To Label | Choose which label to replace the current label with. It is possible to choose Clear, to not label the objects. |
| Within ROI | Defines within what ROI object labels should change. It is possible to choose Clear, which is the area where no defined ROI resides. |
| Within Annotation | Defines within what annotation object labels should change. It is possible to choose Clear, which is the area where no defined annotations resides. |
Apply Counting Frame
The counting frame ensures correct counting of smaller objects and ensures that Change post processing steps are applied to entire objects. It is not relevant for large classification tasks such as tissue detection.
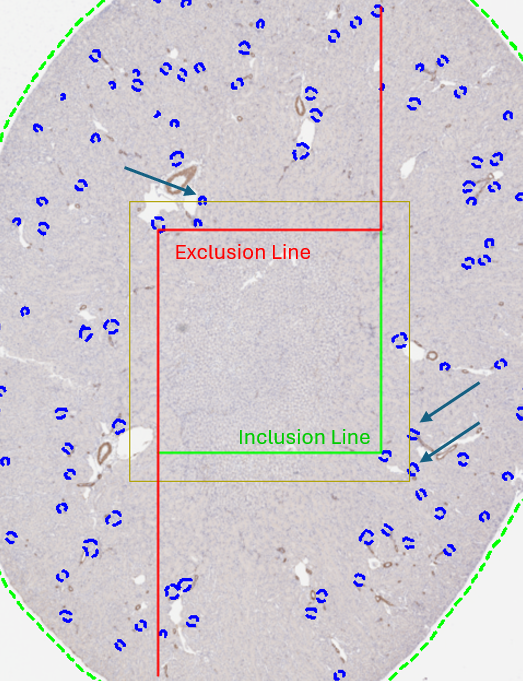
The counting frame (red and green) is placed inside the FOV (yellow). Its adjustable size ensures that each object is processed as a whole object. It works by counting all objects that intersect the green inclusion line once, and simultaneously remove objects that intersect the red exclusion line temporarily to ensure that no object is counted more than once.
Without a counting frame, the APP may count the same object multiple times. For example, a glomerulus that is split by the FOV (marked by blue arrows below) would, without a counting frame, be counted more than once, and Change post processing steps may only be applied to part of an object rather than the entire object. Both of which would lead to incorrect analysis results.
A counting frame can be used either to count existing objects or as part of an APP that also detects the objects.
To use the counting frame, it must be added both under Input, where its size is configured, and as a post-processing step.
To add the counting frame under Input, open the Input section in the APP control and then open Advanced Sampling.

The counting frame can then be added by toggling it on under Sampling Size. It is necessary to determine the distance between the counting frame and the FOV. When configuring this, the largest objects of interest should be approximately 1.5 to 2 times smaller than this distance.
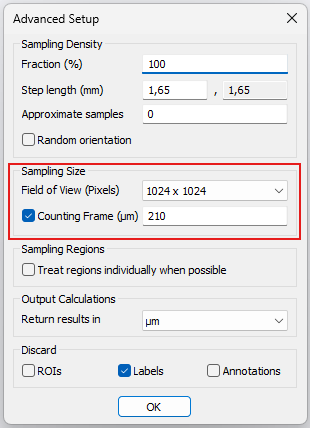
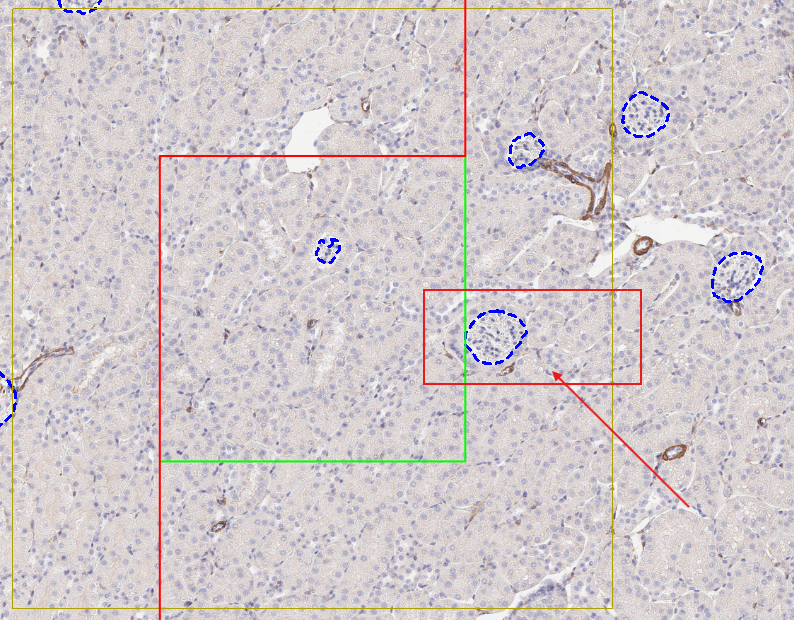
Example showing the Advanced Sampling setup for a glomeruli detection task. The distance between the FOV and the counting frame is 210 pixels (left). This distance corresponds to the largest glomeruli fitting approximately twice within the space between the counting frame and the field of view (right).
The counting frame must also be added as a post processing step. The Apply Counting Frame step, has two configurable parameters.
| Option | Description |
|---|---|
| Object type | Choose the object type to be processed by the step (either Label or Annotation). |
| Object | Choose which label or annotation to be processed by the step. |
If Object is set to All, all objects are internally treated as the same object type. For example, in an image containing both cells and nuclei within those cells, the cell and its nuclei are counted as a single object. However, touching objects of different types are also treated as a single object under this setting, which may lead to counting errors.
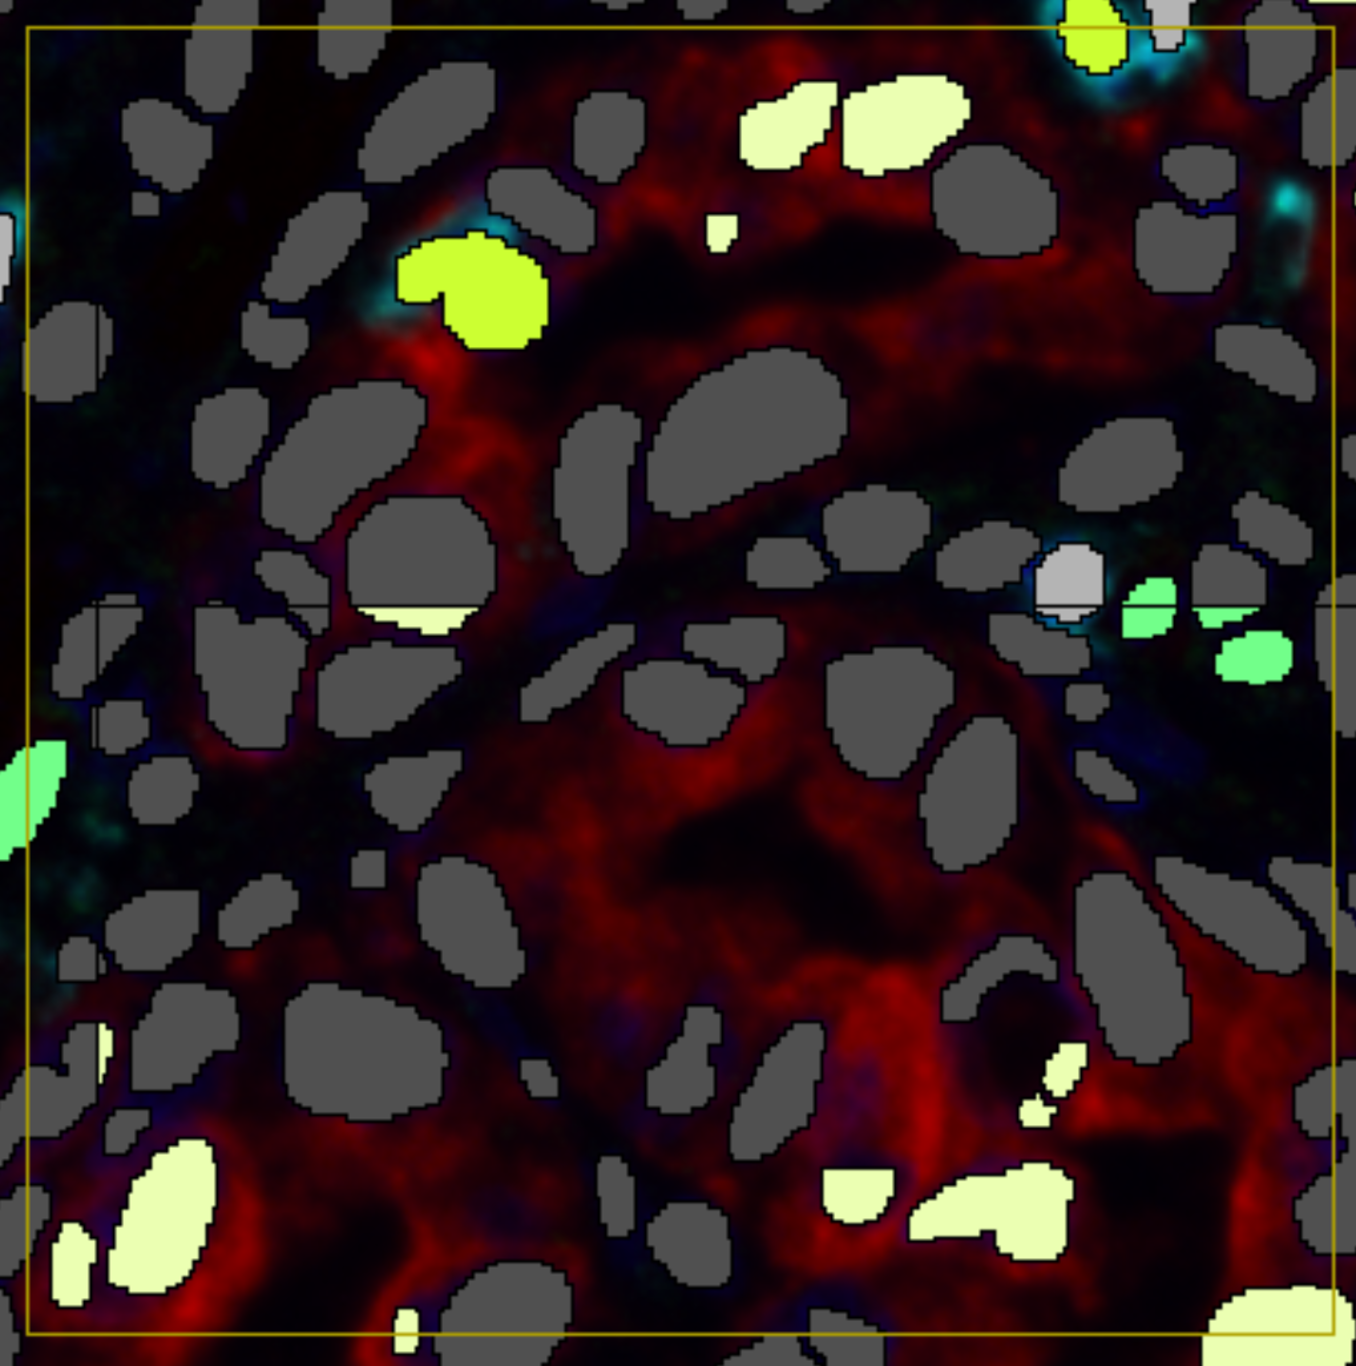
The counting frame needs to be placed after any Morphological post processing step, but before any Change post processing step. See example below.
Revert Label changes
The Revert Label changes step is used to undo all changes made to any labels by the APP, i.e. reverts any label changes made by running the APP, including the classification. This step can be useful in cases where one wants to apply a set of post-processing steps to identify objects of interest, but then wants to return to the original labels. There is no configurable parameters for this post processing step.