Input
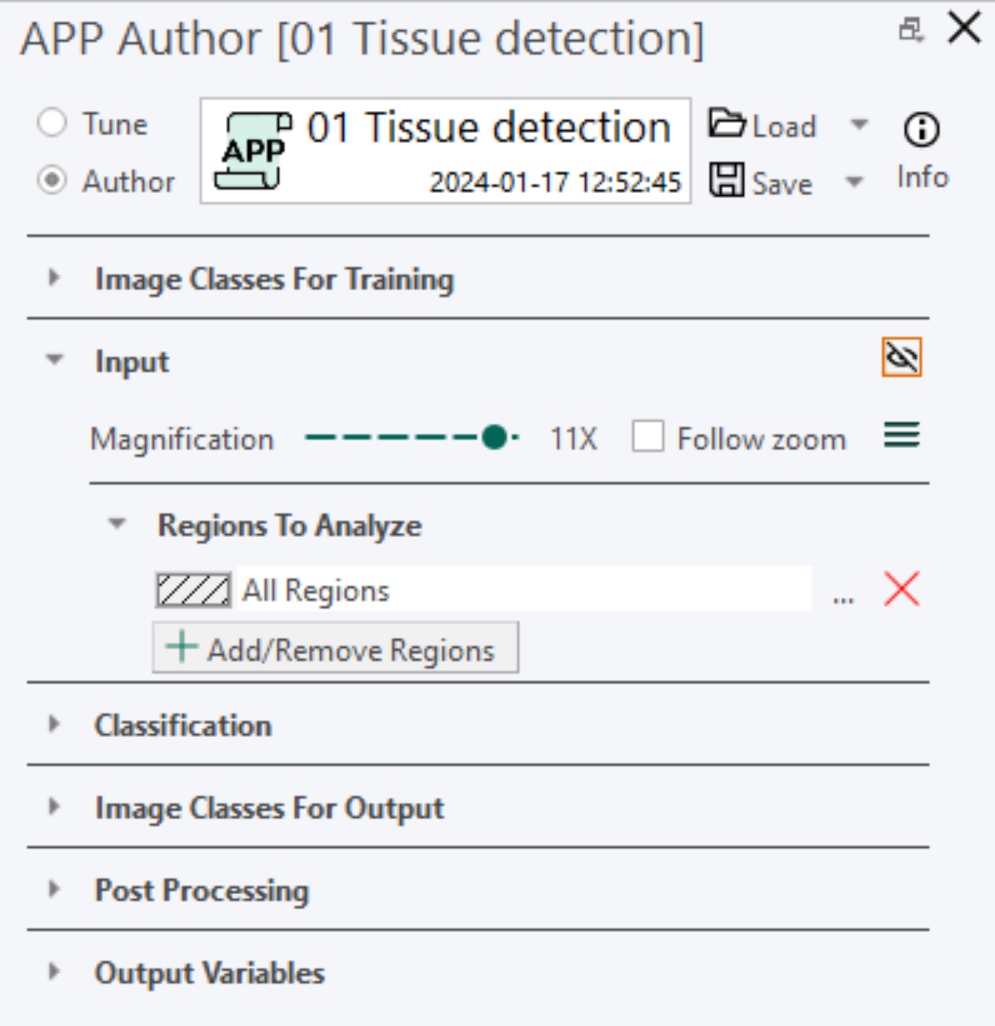
The Input section is the 2nd section in the APP Author dialog and is used for defining the magnification that the APP should use.
The magnification level reflects the magnification from a microscope. A high magnification thus means that fine detail from the image are visible to the APP, while a low magnification means that large scale details are visible. The lower the magnification, the faster the APP will run on a image, so the magnification level should be chosen as low as possible where acceptable/desired results are still obtained.
Images with unknown magnification are automatically assigned a default magnification that matches one of the standard magnification options available in Author. Most of the time 0.25X is set as the default value. The supported magnification range in Author spans from 0.25X to 20X.
Define Which Regions to Analyze
In the Input section, specify how the APP determines which regions of an image to analyze based on the availability of Regions of Interest (ROIs) within the image:
-
All Regions: Selecting "All Regions" prompts the APP to analyze all regions in the image. If no ROIs are defined, the APP will analyze the entire image.
-
Default ROI as Input: When default ROIs are present, the APP will analyze these specific regions. If no ROIs are defined and "Default ROI" is selected, the APP will analyze the entire image.
-
Other ROIs: For any other selected ROIs, if available in the image, the APP will analyze them. If no ROIs are present, an error message will indicate the need to ensure the correct ROI is available.
If the APP is only supposed to run a specific areas in the images, the APP can be setup to only run in a specific region.
| Parameter | Description |
|---|---|
 | Drag the blue pin with the left mouse button to change magnification level of the APP. |
 | When Follow zoom is toggled on, the magnification level automatically follows the current zoom value in the image. Thus, zooming in on the image using the mouse scroll wheel, will correspondingly increase the magnification level of the APP. |
 | Pressing the button opens the Advanced Sampling dialog. In this dialog, image sample options can be changed, the counting frame can be enabled, and options to automatically discard ROIs, labels, or annotations when the APP runs can be selected. |
 | Opens a dialog to include/exclude regions in the APP analysis. An entire image region can be selected if the analysis should run on the entire image. Pressing the button will open the Advanced Sampling dialog, where image sample options can be adjusted, the counting frame can be enabled, and options to automatically discard ROIs, Labels, or Annotations when the APP runs can be set. |
| Allows the included regions to be changed for this specific list element. It opens the same dialog as the Add/Remove Regions button. | |
| Deletes a region from the list. |
Only analyze specific ROI
After configuring the classification, it is possible to run the classification in one or multiple specific ROI(s) selected in the region selection dialog. The following is a short example to demonstrate how this functionality works:
Suppose multiple ROIs are present in an image, but the classification needs to be run in only one or multiple specific ROIs, such as ROI 002 (blue). By default, the classification is set to run in all regions of interest. To change this:
- Click Add/Remove Regions to open the region selection dialog and adjust the included regions.
- In the region selection dialog, uncheck LayerRegions to exclude all ROIs.

- Now click ROI 002 to include this specific region.
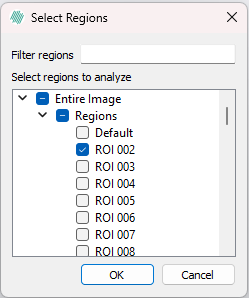
Now, the classification only uses content inside ROIs of type ROI 002. This also applies if multiple specific ROIs are selected in the region selection dialog.
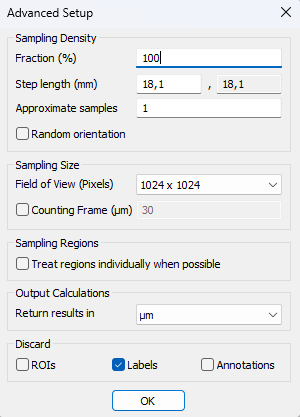
Advanced Sampling
Clicking the ![]() button opens the Advanced Sampling dialog.
button opens the Advanced Sampling dialog.
| Parameter | Description |
|---|---|
| Fraction | The same function as Fraction in the standard view: define the sampling fraction of the given ROIs. |
| Step length (mm) | If the image is calibrated this number shows the length between each FOV (i.e. length between each step). |
| Approximate samples | As an alternative to defining fraction of samples (relative sampling amount) it is also possible to define the exact number of samples (absolute sampling amount). |
| Random orientation | If this is checked the orientation of the FOV-placement will be systematically random. |
| Field of view (pixels) | Determine the size of the FOV in pixels. This will not affect the magnification even though the FOV-square changes size |
| Counting frame | This field activates the counting frame, and determines the size between the counting frame and the FOV. Make sure objects of interest are 1.5-2 times smaller than the distance between the counting frame and the FOV. In addition, the counting frame should be applied with the post process step "Apply counting frame". |
| Sampling Regions | Choose if the sampling should be done in a specific ROI, multiple ROIs, all ROIs, or the entire image. This is also the regions which the classifications are applied to. The Region Selection dialog is opened by clicking the more options buttonMore options. |
| Treat regions individually when possible | If checked, the sampling will be performed in each ROI specified under Regions individually, but only if every individual ROI can fit inside the specified FOV of the sampling. This feature can be used if there is a preprocessing step that should be executed on specific objects in each ROI individually, rather than on all objects across all ROIs. For example, this applies to the Change Largest step if the goal is to change the largest object inside each of ROI 001 individually, rather than the largest object across all of ROI 001. |
| Output Calculations | The Output Calculations can be set to return results in the following units: Pixel, nm, μm, mm, cm, m, and Inch. | | Discard | This gives the option to automatically discard all ROIs, labels and/or annotations prior to running the APP. |