Tagging images
Tags are metadata that describes the images e.g., type of stain, tissue, the scanner used, etc. The tags can be organized in tag groups, which is all handled within the new data.
The tags are image specific and will be valid for the image regardless of which study the image is part of.
It is recommended to set up the tag structure before importing too many images to the database since it otherwise can become difficult to use the tags effectively.
Setup tag structure
-
Click on
 - The Properties pane opens.
 -
Click on Manage Tags, which is in the Tag section's top-right corner - The tag management window opens.
-
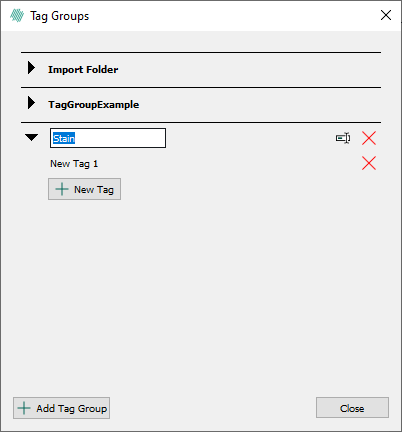
Click on Add Tag Group to add a new group of tags.
-
Write the name of the tag group and press enter.
It is recommended to make tags and tag groups image related, such as the type of stain.
-
Double-click on a tag to rename it.
-
Click on New Tag to add more tags within the tag group.
-
Click Close to finish.
Do not delete the Import Folder tag group since this tag group is automatically generated.
Tagging Images
-
In the content area, select the images you want to tag. You can either select them in
 or in
or in  within a study.
 -
Click on
- The Properties pane opens. -
In the tags section, find the desired tag group and expand it if needed.
-
Start writing the tag in the textbox or click on the little arrow to get a dropdown list of all the tag group's tags.
-
Once you have found the desired tag, select it.
-
The tag has now been added to the selected image(s).
Tags are automatically saved, so you do not need to save them.
Remove tag from image
-
In the content area, select the images you want to remove the tag from. You can either select them in
or in within a study. -
Click on
or right-click on the selection and choose Edit Image Properties - The Properties pane opens. -
In the Tags section, find the desired tag group and expand it if needed.
-
Click on the little red cross to remove the tag from the image(s).
Delete tag and tag group from the database
-
Click on
- The Properties pane opens. -
Click on Manage Tags which is in the Tag section's top-right corner - The tag management window
-
Find the tag group or tag you want to delete and click on the little red cross to delete it.
-
A confirmation window appears to ensure that you do not delete anything by mistake. The dialog will inform you how many images that are using the tag. If you still want to delete it, click OK.