Structuring images in studies
Before you can start analyzing the images, you must add them to a study. The new database gives full flexibility when creating a new study. You can create studies before you have the images or create the study while/after you have imported the images.
Create study during import
-
You must first complete steps 1-4 described in the import images section.
-
When the import is completed, click Add to Study, and the Add to Folder dialog opens.
-
In the Add to Folder dialog, create the desired folder structure by clicking on New Folder.
New folders will be created under the folder you have selected. Once you have made the folder structure, select the folder you want to add the images to.
- Click OK.
Create study from the image tab
-
Select the images you want to add to a study. You can do this by using one of the following ways:
- Ctrl + Click on the desired images.
- Click and hold. Mark the images you want to select.
- Select the first image and then Shift + Click on the last image.
- Ctrl + A to select all the images visible in the content area.
-
Right-click on the images and select Add Selected Images to Folder.
-
In the Add to Folder dialog create the desired folder structure by clicking on New Folder.
New folders will be created under the folder you have selected. Once you have made the folder structure, select the folder you want to add the images to.
- Click OK.
Create study before images are imported
-
Click on the
 tab.
tab. -
Right-click in the content area and select New Folder from the menu.
-
Name the folder and press enter.
-
Select the folder you just created and create a new folder under it.
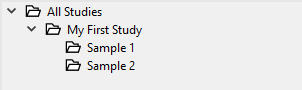
Your study has now been set up, and you can start adding images to the folder by either adding them from the ![]() tab or while you import images to the database.
tab or while you import images to the database.
Deleting a folder
-
Click on the
tab. -
In the navigation area, navigate to the desired folder.
-
Right-click on the folder and select Delete from the menu.
-
A confirmation window appears to ensure that you do not delete anything by mistake. The dialog will inform you which subfolders are found inside the folder you are trying to delete. If you still want to delete it, click OK otherwise, click Cancel.
The images in the folder will NOT be deleted. To delete an image you must delete it under the ![]() tab.
tab.
- You have now deleted the folders and all results from analysis conducted in the study.
Copying a folder
-
Click on the
tab. -
Navigate to the folder or subfolder you want to copy.
-
Right-click on the folder and select Copy from the menu.
-
A new window appears where you can navigate to the folder you want to copy the study into. Select the desired destination folder by left clicking it.
-
Press the Copy button to complete the copying.

If you also want to copy the results attached to the study, check the box 'Include non-overlay results'.
If you also want to copy the overlays attached to the study, check the box 'Include overlays'.
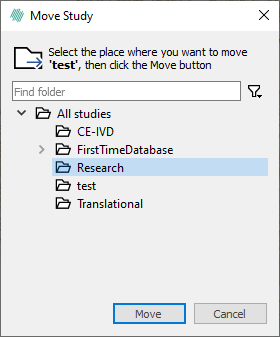
Moving folders or studies
-
Click on the
tab. -
Navigate to the folder or subfolder you want to move.
-
Right-click on the folder and select Move from the menu.
-
A new window appears where you can navigate to the folder you want to move the study into. Select the desired destination folder by left clicking it.
-
Press the Move button to complete the moving.