The Wheel Menu
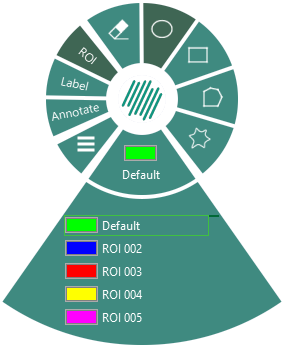
The Wheel menu is an intuitive and interactive feature that allows the user to easily use the overlays. It is an expandable interface that ease the navigation of overlay tools. The Wheel is available from almost every module in Visiopharm as it is by default used to draw Regions of interest (ROI), Labels, and Annotations onto an image.
The Wheel is activated by right-clicking anywhere in the working area. There are 3 default overlay tools in the Wheel menu:
Region Of Interest (ROI) - Draw regions on the image which limits the focus of analysis to these areas.
Label - Draw labels to train the APP to recognize a given tissue or tissue structure.
Annotation - Draw annotations to deploy informative notations on the image and/or use it to add geometric measurements of areas or distances along lines and curves in the image
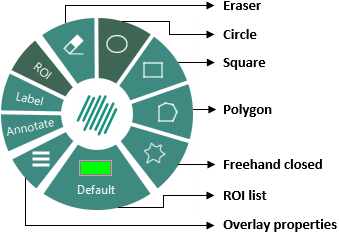
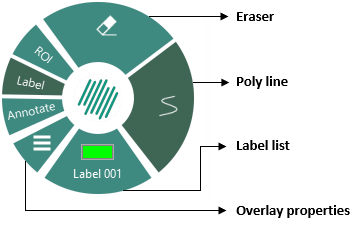
Every tool/part of the Wheel can be selected. Each tool includes a list of drawing options on the right-hand side, and a scrollable list of object types at the bottom of the menu.


The menu icon ![]() opens the Overlay Properties for the selected tool.
opens the Overlay Properties for the selected tool.
Region of Interest (ROI)
In many applications, the concept of a region of interest (ROI) is very useful. A ROI defines a subset of image pixels (a region) to which processing and measurement is confined, i.e., pixels outside the ROI are ignored in the computations.The ROI do not need to be continuous and furthermore, multiple ROIs are supported. Defining the ROI is referred to as ROI drawing. When selecting the ROI tool, the following options/functions are available:
Press F4 to open ROI Properties.
Draw a ROI
ROI drawing is easy with the wheel:
Right-clickanywhere in the working area of Visiopharm to activate the Wheel.- Select ROI in the Wheel to activate ROI drawing with the current active ROI (Default).
- Hover over the current ROI (Default) to expand the Wheel, as shown below.
Click ROI to activate ROI drawing and hover over the type (Default) to expand the Wheel. - The mouse pointer changes from
 to
to  when ROI is activated.
 - Click and hold the
left mouse buttonand move the mouse to draw the desired ROI. - Simply release the mouse button to finish the drawing.
When in drawing mode, press and hold the Shift key and then use the mouse to pan the image.
It is possible to change the default shape by selecting one of the 4 options on the right-hand side of the wheel. Other shapes are available from the Draw page of properties.
Draw multiple ROIs quickly
To draw another ROI, double right-click in the working area or press the R key to reactivate ROI drawing. The mouse pointer will update to ![]() indicate drawing mode.
To draw a different ROI type, double
indicate drawing mode.
To draw a different ROI type, double right-click or press the R key, followed by a number key e.g., press 5 for ROI 005.
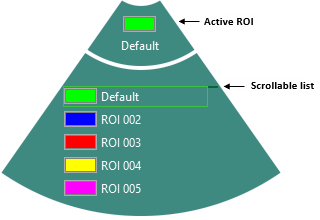
Change current active ROI
The current ROI is the ROI highlighted in the scrollable list of the expanded Wheel. Change the current ROI in the Wheel by:
Right-clickanywhere in the working area of Visiopharm to activate the Wheel.- Select the ROI in the Wheel.
- Hover over the list and use the middle mouse button to scroll the list.
- When the desired ROI is highlighted, simply click the list to start drawing the ROI.
The expandable Wheel menu
Delete a ROI
To delete a single ROI, the ROI drawing tool must be activated first:
Right-clickanywhere in the working area of Visiopharm to activate the Wheel.- Click ROI in the Wheel as shown below to activate ROI drawing.
Click ROI to activate ROI drawing - The mouse pointer changes from to indicating that ROI drawing is activated.
- To delete an ROI, hover the mouse over the ROI until it is highlighted in yellow.
- While the ROI is highlighted, press
Deletekey to delete the ROI.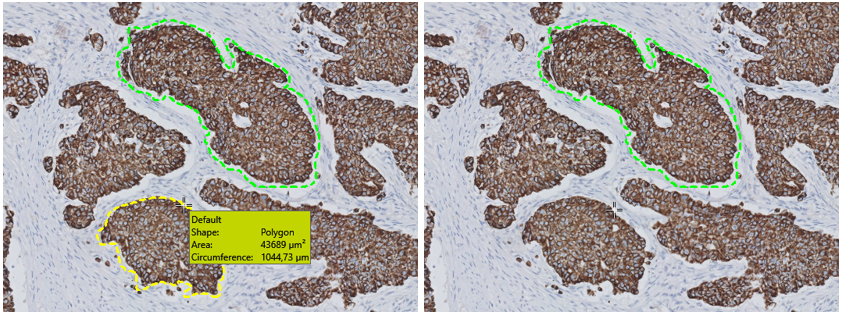
Hover over the ROI to highlight it and press the Delete-key to delete the ROI (Breast cancer tissue CK18).
While highlighting a ROI, the overlay info box appears displaying information about the highlighted ROI.
Notice that the mouse pointer changes back to ![]() . To delete another ROI, follow the steps again.
. To delete another ROI, follow the steps again.
Delete multiple ROIs
To delete all ROIs, the ROI drawing tool must be activated first:
Right-clickanywhere in the working area of Visiopharm to activate the Wheel.- Click ROI in the Wheel as shown below to activate ROI drawing.
Click ROI to activate ROI drawing - The mouse pointer changes from to indicating that ROI drawing is activated.
- Hold down the
Shift-key and press theDelete-key to delete all ROIs.
Notice that the mouse pointer changes back to ![]() .
.
It is not necessary to highlight any ROI to delete all ROIs
Erase part of a ROI
The erase tool can be used to delete a part of a ROI:
Right-clickanywhere in the working area of Visiopharm to activate the Wheel.- Click ROI in the Wheel.
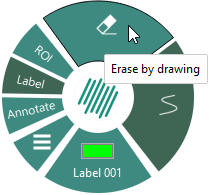
- Select the Erase by drawing tool at the top of the wheel:
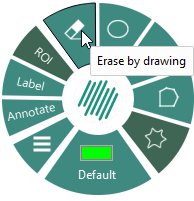
The 'Erase by drawing' tool - The erasing tool works like the poly line tool. Click and drag over the area that needs to be erased.
Draw multiple ROIs using properties
To draw multiple ROIs of different types without using the Wheel each time (e.g., when training a classifier in an APP), use the Space key or enable ROI Properties. When ROI Properties is open, Visiopharm remains in ROI drawing mode after each ROI is completed.
- Open ROI Properties by clicking the properties icon (
 ) in the Wheel, or press
 F4. - Select the current active ROi from the View page.
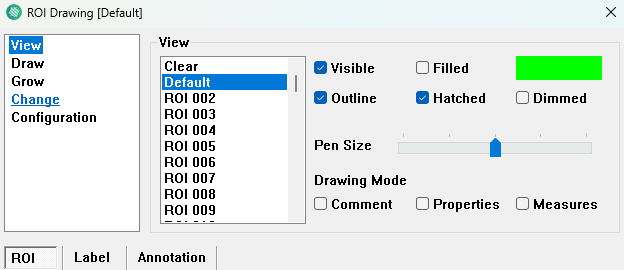
- Click in the working area to activate ROI drawing. Notice that the mouse pointer changes from to indicating that ROI drawing is activated.
Left-clickto start drawing and use the mouse to draw the ROI.- When the drawing of one ROI is finished,
double-clickit to complete the ROI.
After completing one ROI, Visiopharm remains in ROI drawing mode (mouse pointer stays active), allowing for continuous drawing of additional ROIs. To exit ROI drawing mode, close the ROI Properties panel.
When in drawing mode, press and hold the Shift key and then use the mouse to pan the image.
Label
The concept of labels is similar to the ROI-concept, but labels are "painted" on the image and are visualized differently. Each pixel in the image can be assigned to a label. The labels can be thought of as an extra layer on top of the image. The labels are useful in tasks such as classification
Press F7 to open the Label Properties.
Draw a label
Label drawing is easy with the Wheel:
Right-clickanywhere in the working area of Visiopharm to activate the Wheel.- Click Label in the Wheel.
Click Label to activate label drawing - The mouse pointer changes from to indicating that label drawing is activated.
Left-clickto start drawing and use the mouse to draw the label.- When the drawing of one label is finished,
double-clickit or press theRkey to complete the label.
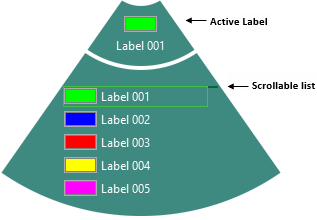
Notice that the current active Label is the label highlighted in the scrollable list in the expanded Wheel.
When in drawing mode, press and hold the Shift key and then use the mouse to pan the image.
Notice: The default drawing shape using the Wheel is the polyline. Other shapes are available from the Draw page of properties. Drawing multiple labels: To draw another label, double right-click or press the R key to reactivate label drawing mode. The mouse pointer changes again to ![]() which enables another Label (step 3-4) followed by a number key e.g.
which enables another Label (step 3-4) followed by a number key e.g. 5 key for Label 005.
Change current active label
The current active label is the label highlighted in the scrollable list in the expanded Wheel. Change the current label in the Wheel by:
Right-clickany where in the working area of Visiopharm to activate the Wheel.- Hover over Label in the Wheel to expand the Label overlay tool.
- Hover over the list and use the middle mouse button to scroll the list.
- When the desired label is highlighted, simply click the list to start drawing the label.
The expandable Wheel menu
Delete a label
To delete a single label, the Label drawing tool must be activated first:
Right-clickanywhere in the working area of Visiopharm to activate the Wheel.- Click Label in the Wheel as shown below to activate Label drawing.
Click Label to activate Label drawing - The mouse pointer changes from to indicating that Label drawing is activated.
- Hover the mouse over the label to be deleted until it is highlighted in yellow.
- While the label is highlighted, press the
Deletekey to delete the label.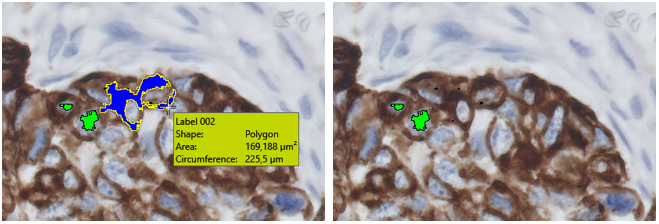
Hover over the label to highlight it and press the Delete-key to delete the label (Bladder tissue DAB stain).
While highlighting a label, the overlay info box appears displaying information about the highlighted label.
Notice that the mouse pointer changes back to ![]() . To delete another label, repeat steps 1-5.
. To delete another label, repeat steps 1-5.
Delete all labels
To delete all labels, the Label drawing tool must be activated first:
Right-clickanywhere in the working area of Visiopharm to activate the Wheel.- Click Label in the Wheel as shown below to activate Label drawing.
Click Label to activate Label drawing - The mouse pointer changes from to indicating that Label drawing is activated.
- Hold down the
Shiftkey and press theDeletekey to delete all labels.
Notice that the mouse pointer changes back to ![]() .
.
It is not necessary to highlight any labels to delete all labels.
Delete parts of labels
The erase tool can be used to delete a part of a label by:
Right-clickanywhere in the working area of Visiopharm to activate the Wheel.- Select Label in the Wheel.
- Select the Eraser tool at the top of the wheel.
The 'Erase by drawing' tool - The erasing tool works like the Polyline tool. Click and drag over the area that needs to be deleted.
Draw multiple labels using properties
To draw multiple labels of different types without repeatedly using the Wheel (e.g., when training a classifier in an APP), use the Space key or enable Label Properties. With Label Properties open, Visiopharm remains in label drawing mode after each label is drawn.
- Open ROI Properties by clicking on the properties icon () in the Wheel or by pressing
F7. - select the Label tab.
- Select the current active label from the View page.
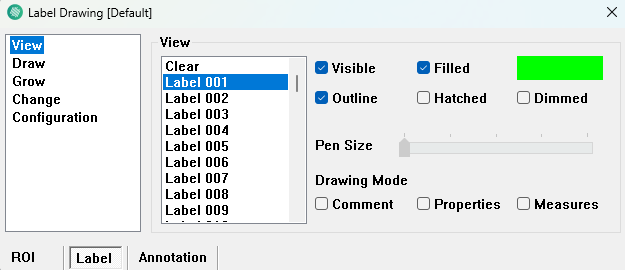
- Click in the working area to activate Label drawing. Notice that the mouse pointer changes from to indicating that Label drawing is activated.
Left clickto start drawing and use the mouse to draw the label.- When the drawing of one label is finished,
double-clickit to complete the label. When finishing drawing a label, Visiopharm will remain in Label drawing mode (Mouse pointer is still). This allows continuous drawing of labels without interruption. - Close Label Properties to exit Label drawing mode.
When in drawing mode, press and hold the shift key and then use the mouse to pan the image.
Annotate
Annotations are primarily used for marking and noting objects in images. For image analysis and calculations, it is recommended to use ROIs and labels instead, as annotations may overlap and cause confusion.
Press F5 to open the Annotation Properties.
Draw an annotation
To activate annotation drawing, simply follow these steps:
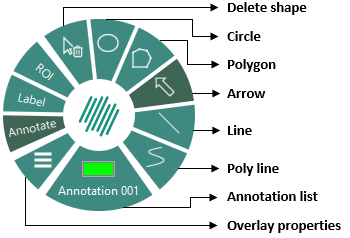
Right-clickanywhere in the working area of Visiopharm to activate the Wheel.- In the Wheel, select Annotate and choose the correct annotation type and drawing mode. When drawing is activated, the mouse pointer changes from to .
Click Annotate and annotation type to activate annotation drawing. - Now,
left clickto start drawing and use the mouse to draw the annotation. - Depending on the drawing mode, double-click, let go or press the
Rkey to complete the annotation. When the annotation has been drawn, the Edit Text dialog will appear, as seen below, where it is possible to add any comment necessary.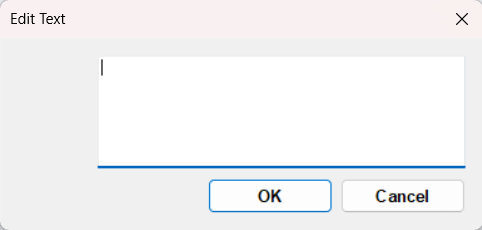
- Click OK to complete the annotation.
Drawing multiple annotations:
To draw another annotation, double right-click in the working area or press the R key to reactivate annotation drawing. The mouse pointer will change to a crosshair, allowing the creation of additional annotations. To switch annotation types, double right-click or press the R key, followed by the corresponding number key (e.g., "5" for Annotation 005).
When in drawing mode, press and hold the Shift key and then use the mouse to pan the image.
Notice that it is possible to change the default shape by selecting one of the 5 options on the right-hand side of the wheel. Other shapes are available from the Draw page of properties.
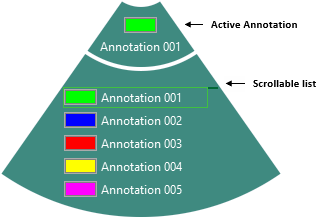
Change current active annotation
The current active annotation is the annotation highlighted in the scrollable list of the expanded Wheel. This annotation can be changed in the Wheel by:
Right-clickanywhere in the working area of Visiopharm to activate the Wheel.- Hover over annotation in the Wheel to expand the Annotation overlay type.
- Hover over the list and use the middle mouse button to scroll the list.
- When the desired annotation is highlighted, simply click the list to start drawing the annotation.
Delete an annotation
To delete a single annotation, the annotation drawing tool must be activated first:
Right-clickanywhere in the working area of Visiopharm to activate the Wheel.- Click Annotate in the Wheel as shown below to activate annotation drawing. The mouse pointer changes from to indicating that annotation drawing is activated.
Click Annotate to activate another annotation drawing. - Hold the mouse over the annotation to delete, so that the annotation is highlighted as yellow.
- While the annotation is highlighted, press the
Deletekey to delete the annotation.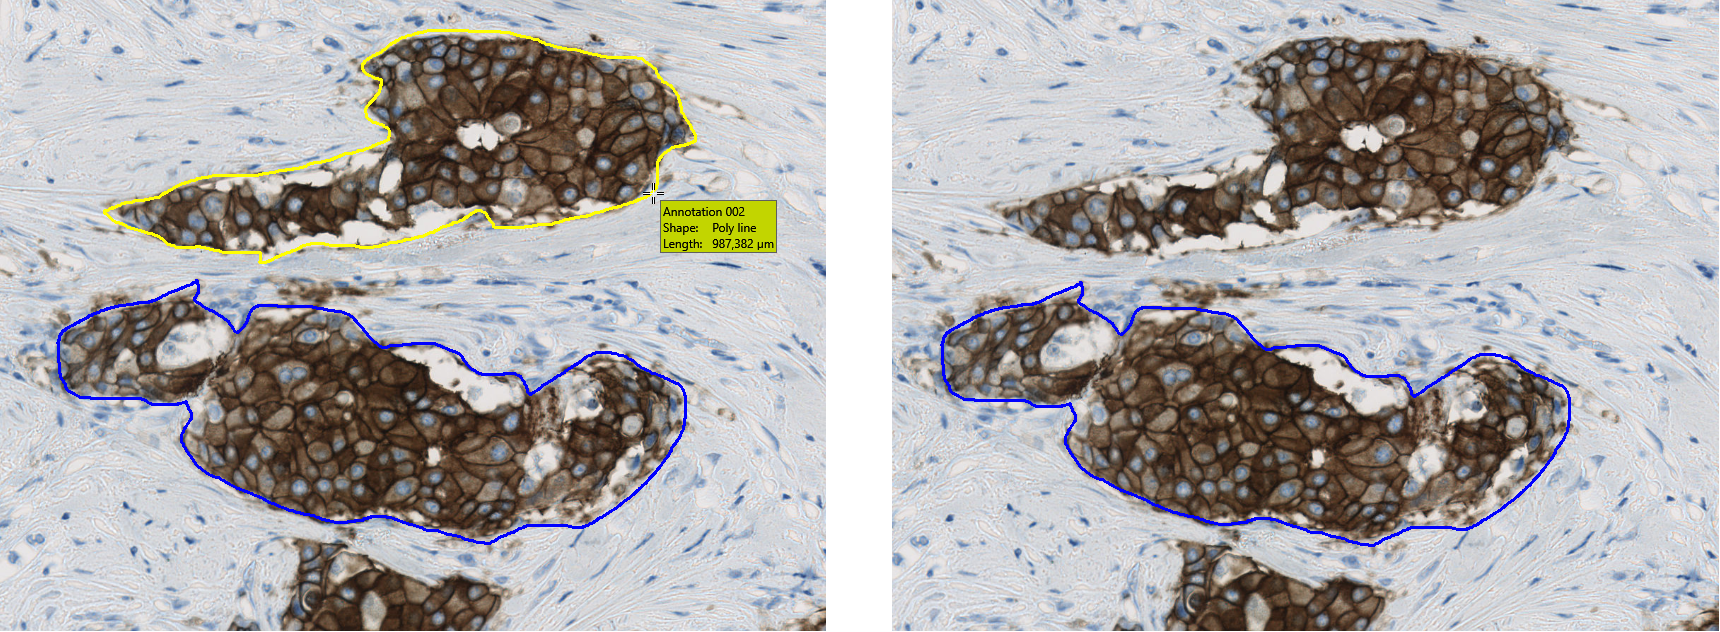
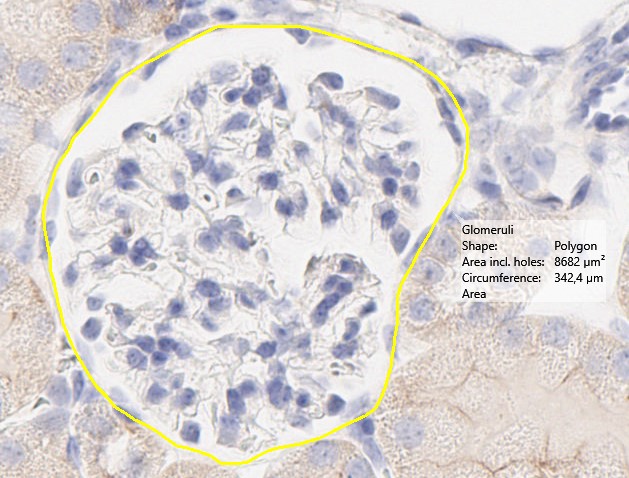
Hover over the annotation to highlight it and press the Delete-key to delete it (Breast cancer tissue, HER2).
While highlighting an annotation, the overlay info box appears displaying information about the highlighted annotation.
Delete all annotations
To delete all annotations, the annotation drawing tool must be activated first:
Right-clickanywhere in the working area of Visiopharm to activate the Wheel.- Click Annotate in the Wheel as shown below to activate annotation drawing. The mouse pointer changes from to indicating that annotation drawing is activated.
Click Annotate to activate annotation drawing. - Hold the
Shift-keyand press theDelete-keyto delete all annotations. Notice that the mouse pointer changes back to.
It is not necessary to highlight an annotation to delete all annotations.
Draw multiple annotations using properties
To draw multiple annotations of different types without using the Wheel, use the Space key or enable Annotation Properties. When Annotation Properties is open, Visiopharm will remain in annotation drawing mode after each annotation is drawn.
-
Open Annotation Properties by clicking the properties icon (
) in the Wheel menu or press F5. -
Select the current active annotation from the View page.

-
Click in the working area to start drawing the annotation. Notice that the mouse pointer changes from
to indicating that annotation drawing is activated. -
Left-click to start drawing and use the mouse to draw the desired annotation.
-
When the drawing of one annotation is finished, double-click it to complete the annotation. When finishing drawing one annotation, Visiopharm will remain in annotation drawing mode (mouse pointer remains
). This allows for continuous annotation drawing without interruption. -
Close Annotation Properties to exit annotation drawing mode.
When in drawing mode, press and hold the Shift key and then use the mouse to pan the image.
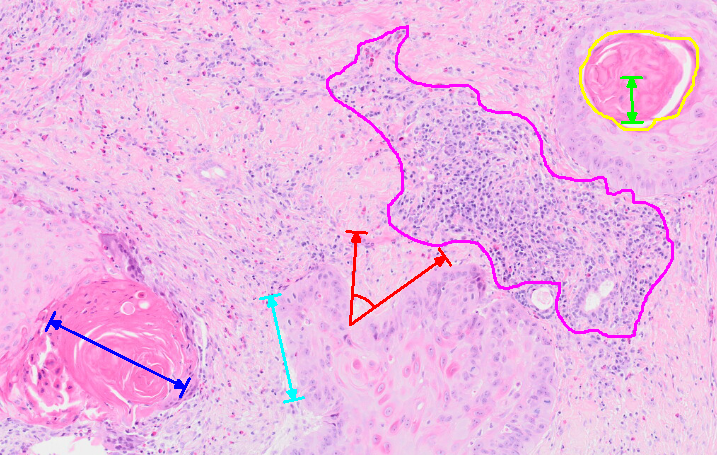
Measure with an Annotation
The Measure provides tools for easy, interactive geometric measurements of length along lines and curves, area, angles and circumference in the image. The user can define up to 255 different measure tools with individual names and colors.
View properties
Advanced measurements can be performed using the Annotation Properties tool.
-
Open Annotation Properties by clicking the properties icon (
) in the Wheel menu or press F5. -
Select measures under Drawing mode from the View page.

-
Click in the working area to start drawing the measurement. Notice that the mouse pointer changes from
to indicating that measurement drawing is activated. -
Left-click to start drawing and use the mouse to draw the desired measurement.
-
When the drawing of one measurement is finished, double-click it to complete the measurement, a text box will appear here the mesurement can be named. When finishing drawing one measurement, Visiopharm will remain in measurement drawing mode (mouse pointer remains
). This allows for continuous measurement drawing without interruption.
When in drawing mode, press and hold the Shift key and then use the mouse to pan the image.
Select the active measure tool by clicking the left mouse button in the list of tools in the View page. The active tool is highlighted with blue.
-
Double-click on a measure to assign a descriptive name. See below.
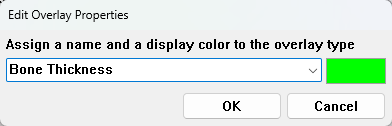
Assign a descriptive name to the measure tool. -
Click on the color rectangle to assign a new color to the measure tool. See below.
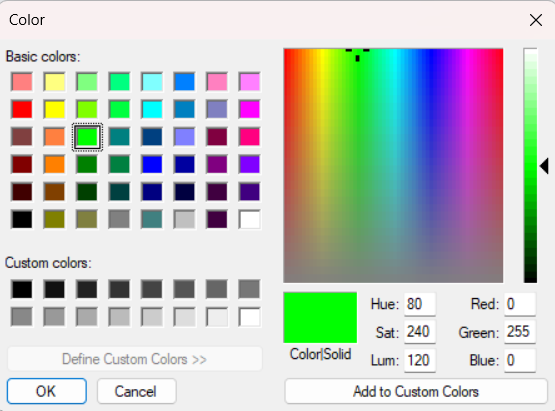
Assign a new color to the measure tool. -
Click Delete Annotation in the wheel to activate delete mode, allowing the removal of one specific measure at a time.
-
Click Delete all to delete all measures of all types.
-
Visible - Select to show the active tool.
-
Outline - Select to outline the measuremrnt in the working area.
-
Filled - Select to fill the measurement (Pen size will be deactivated when this is on ).
-
Dimmed - Select to make the measument see through.
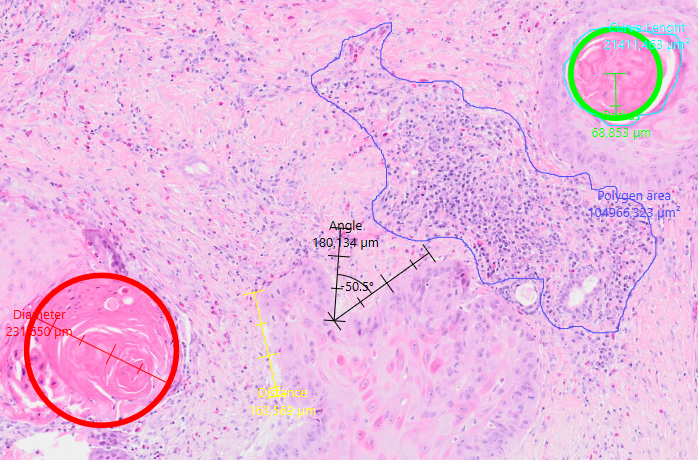
Length
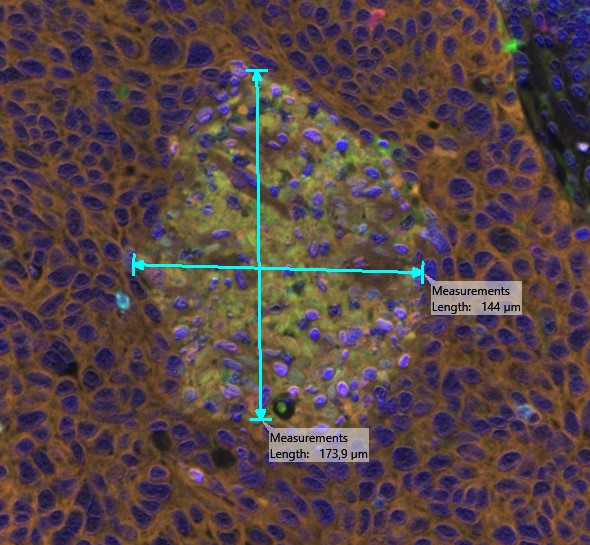
Measures the Length along a straight line between two points. Left-click on the starting point and move the mouse while holding the left mouse button. A ruler with tick marks is displayed on the image and the Length from the starting point to the mouse position is displayed. When the left mouse button is released, the ruler remains visible on the image.
Any number of measures of a given type can be added as needed.
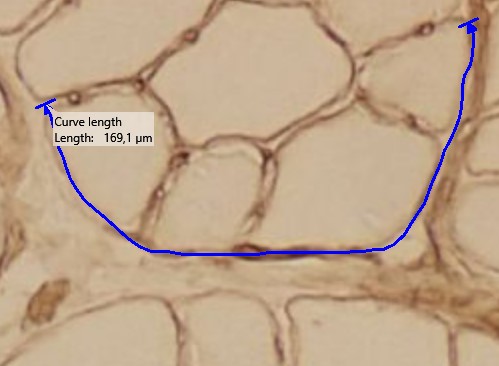
Curve length
Measures the distance along a freehand drawn curve. Left click on the starting point of the curve and drag the mouse around the image while holding the left mouse button. A curve is drawn in the trace of the mouse and the distance from the starting point along the curve is updated as the mouse is moved.
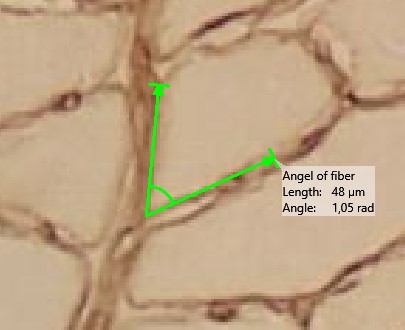
Angle
Measures the angle between two straight lines. Left click on the starting point of the first line and then move the mouse whitout holding the left mouse button. Left click, and move the mouse to the ending point of your angele and double left click. This results in a second line with origin in the ending of the first line, and the angle between the two lines is displayed. The angle is displayed in radians. To change the units go to the scale bar menu or under outputs.
Area
Measures the area inside a shape. Hold left mouse button and draw around the part of the image that is to be measured.
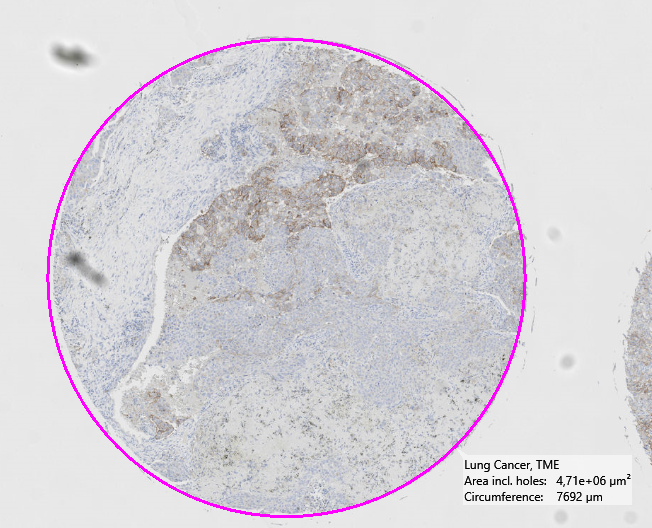
Circumference
The Circumference measurement represents the total length around the boundary of a Annotation.
Configuration properties
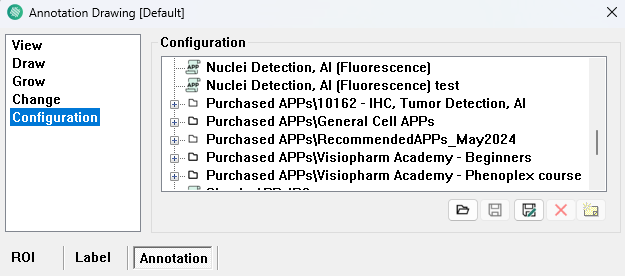
In the Configuration page, configurations are handled. The existing configurations are listed to the right, and the currently active is shown in the Active field. If the current configuration is not saved a '*' is shown after the name of the configuration in the title bar. A measure configuration holds all of the information which is specified in the measure dialog.
 Load the configuration that
is selected in the list. The current configuration is lost if it has not been saved.
Load the configuration that
is selected in the list. The current configuration is lost if it has not been saved. Save the current configuration
under the name that is selected in the list.
Save the current configuration
under the name that is selected in the list. Save the current configuration
under a new name. A dialog where the new configuration name can be specified is
launched.
Save the current configuration
under a new name. A dialog where the new configuration name can be specified is
launched. Delete the configuration that is selected in the list. When a configuration
is deleted from within Visiopharm, the configuration files are backed up in Windows
Recycle Bin. The files are placed in the root of Recycle Bin. To restore the files,
sort Recycle Bin by original location, select all files from a configuration folder,
and click "Restore the selected items" to restore.
Delete the configuration that is selected in the list. When a configuration
is deleted from within Visiopharm, the configuration files are backed up in Windows
Recycle Bin. The files are placed in the root of Recycle Bin. To restore the files,
sort Recycle Bin by original location, select all files from a configuration folder,
and click "Restore the selected items" to restore. Add information
about the current configuration.
Add information
about the current configuration.
Legacy Measure Tool
The Legacy Measure Tool enables automatic when loading of older .mea files into the annotation layer when an image is opened. This ensures that existing measurement data created with previous versions of Visiopharm remains accessible and visible.
Import Legacy measurements
- When an image is opened in Visiopharm, the system checks for a corresponding
measures.meafile. - If the file exists, all legacy measurement annotations (e.g., length, angle, diameter, polygon) are imported and displayed in the annotation layer.
Measurement in Visiopharm 2024.07
- To avoid re-importing the same data each time the image is loaded, a
.migratedmarker file is created in the database folder where the associated layer set is stored.


Re-importing Legacy Measurements
If re-import of the legacy measurements is required:
- Navigate to the database folder where the image’s layer set is stored.
- Delete the
.migratedfile associated with the image. - Reopen the image to trigger a fresh import of the
.meadata.